
Windows 11 , the latest offering from Redmond based Tech Giant is under deployment phase now . Many windows 10 laptops have been already upgraded to Windows 11 .
On Newer hardware , Windows 11 works like a charm . Its UI looks clean , minimal . It has just the right amount of translucency , the rounded corners and overall animations make user experience way better than what Windows 10 used to be .
Although ,Windows 11 has obvious advantages on newer hardware , on unsupported or older hardware , we can see issues like lagging animations , high memory usage , high CPU usage and overall performance drop.
So today we are taking a look at making windows 11 fast and efficient . Lets Start !
To make any system fast , we need to make it either powerful or we need to reduce the load or both . In this case we cannot increase our power as hardware is fixed . So we will reduce load of operating system as much as possible and change various settings to optimize it.
For this article I have used laptop running windows 11 . Having following system configuration .
CPU : Intel core i3 6006U
RAM : DDR4 2133 MHz 12 GB Dual Channel (8+4)
Storage : 512 GB Samsung 860 Evo SATA SSD
As you can see , processor here is not officially supported by Windows 11 . So whatever tweaks we are going to make will work for both supported and unsupported processors . Although new processors will not need all the tweaks .
Contents
1. Reduce Visual Effects
In Windows 11 , visual Effects is one of the main focus points of overall user experience . On new hardware we can keep visual effects on but on old hardware , it can increase performance . which is our goal today .
So to reduce or turn off visual effects , follow these steps.
Open Settings Application and go to Accessibility. Here you can see Option for Visual Effects . Open it .

Now, here we can turn off transparency , animations and scroll bar . I’ll recommend turning off all 3 for better performance .


As you can see all the windows 11 eye candies have been removed. Now you will notice faster animations and less loading time while using it . It will also reduce GPU usage which effect in better performance and less heat .
2. Reduce Number of Startup Applications
Although , normal system performance matters a lot, system startup is crucial part of overall fast working experience .
Reducing number of startup application definitely increase system boot speed and reduce boot time .
To turn off startup applications , follow the steps :
Settings –> Apps –> Startup

Turn off all the apps that you don’t need at startup . It will reduce your system startup time drastically.

3. Services Optimization
Warning : This is a tricky part and should be done if you have some experience and knowledge of how systems work .
Services are those process/ applications that work in background and wait for some trigger to be activated . When they are called ,they come to front and do the task . But many times lot of unnecessary services run in background . which can we turned off to reduce ram and CPU usage
First of all open Services application from windows search

After opening you can see application interface like this . Here you can see Name of service , description about it , its status ( running or empty) and startup type .

Now Right click the service and click stop to stop it .

Here I have stopped gamming service as its not being used .
But , this is temporary fix as you can see gamming service has startup type automatic . It will start again after restart .
To disable a service , right click , properties , and change startup type to disabled.

4. Optimize Device Usage
Now we will select use cases for our device . Open Device usage option from personalization tab of settings application.

If your setting look something like this , it will add a lot of additional features to windows to make it ready for those tasks . Try to uncheck options which are not used frequently .
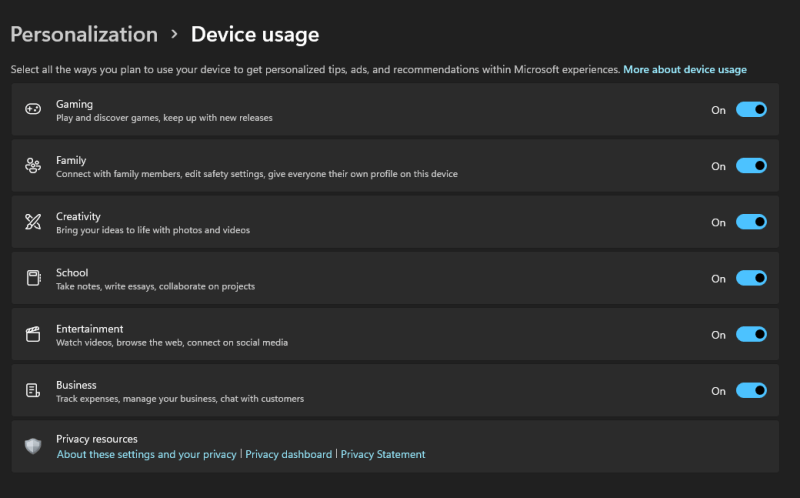
Here is example , if you are a school or college student keep only these 2 . This will reduce additional windows features from running in background and our apps will run faster.

5. Optimizing Paging
Warning : If your laptop has less than 8GB of RAM , please skip this setting .
Paging is feature of windows by which it uses SSD /HDD storage as RAM . But as SSD and HDD are way too slow in comparison to RAM , it degrades overall system performance .
So if you have 8 GB or higher RAM , follow these steps .
Open Adjust appearance and performance application .

Open Advanced tab . Here select programs in processor scheduling . And click on change button to adjust page file size.

Change your seeting like this for faster performance

6. Drive Optimization
Secondary Storage or SSD/HDD are one of the most important parts of system .
Its better to have SSD instead of HDD as SSD has better read write performance .
For Drive optimization we will use 2 application , Disk cleanup and Disk Optimizer and will enable Storage sense from setting .
open disk cleanup application

click on Clean up system files

here select options taking lot of disk space , specially older windows versions and windows update files . If you have upgraded from windows 10 to windows 11 , it may take up to 18 GB of disk space .
After selection , press OK

This dialog will appear . Let it clean the system . It will close automatically when done .

Next , open disk defragment and optimization application

Click optimize to optimize the drive . Once done , close the app .

Next is enabling Storage Sence .
Go to Setting –> system –> Storage

Here , enable storage sense which will remove unnecessary files when storage starts filling up .

7. Browser Optimization
Here I am taking example of default edge browser . If you are on another browser you can skip this step.
You can enable efficiency mode in edge browser to reduce RAM consumption of browser and limit background activity.
To do that select performance option from edge menu and set it to always .


8. Battery Profile optimization
We can improve performance by removing power limit .
To do that , open settings –> system –> power and battery

Here change power mode to High Performance , to allow system to draw more power . It allows CPU to work at its best.

In this article , we have changed a lot of things to get our desired results .
I hope i will work for you . If any issue found , you can comment below .
That it for today guys , see you in next one .